Friday, November 16, 2012

Holiday Traditions - What day is that again?


Well the holidays can be such a special time if you choose to make them so. Again, it doesn’t require a lot of money or fancy things. We have a large family. I am the youngest of 4 with three older brothers. We are all married with kids and when we gather with our parents, spouses, and all our kiddos there are 19 of us (this does not include any grandparents or extended fam). My mom started a great tradition but first let me give you a little back story. My brothers all decided they wanted to get engaged in about a 6 month swing. Then they all decided to go ahead and get married the following year in April, June, and July. It was a busy summer and new little families were being formed. As they holidays were approaching mom decided she wanted to change things up a bit. She wanted to be able to see us all and spend time with us on the holidays but knew how difficult it would be for everyone to get to in-laws and grandparents and other family gatherings all in one day. So, she decided it wasn’t about the day it was about the time spent together. Since that year we have always spent the holidays on an off weekend. That way we get time with both sets of family and we aren’t torn. This has been an amazing tradition. We get to spend a weekend at mom and dad’s all 19 of us crammed in their house playing games, giving gifts, staying up late, having a dance party here and there and just really getting that quality time we wouldn’t if we were so worried about the day and date on the calendar.

And of course since this is Keylee’s birthday week I have to share one more thing about my little bit. A tradition of sorts. Before she was born some ladies that Bryan worked with gave him a sweet little onesie and tutu for her to wear on her first birthday. So, I got it out on that day I pulled them out and snapped a few pics of her. I decided this year to try it again and made her a tutu and did a few similar pics so we could see how much she had changed. Take a look at how grown up she is now. Love her to pieces. I hope to continue this little tradition for years to come. The tutu might have to go at some point but hopefully I can still get her to hand me a leaf!


Happy Friday!
Daspri

Thursday, November 15, 2012

Birthday girl and DiY Growth Chart


As you saw from Tuesdays post Keylee had her big party on Saturday. Yesterday was her actual birthday and I wanted to do a couple fun things. So, we spent the day doing Keylee stuff. She woke up to a couple balloons in her room that I had ready for her to see first thing.
 
 I made a little measurement chart that we’ll be using every year, so we measured after we got dressed and then had a laid back morning and hung out just the two of us for a bit.
 
Then we went and picked up cousin J for a play date (this was a first time for this and she looooves J). We played outside, inside and ran around.  
 
 
Took J home and ate some lunch. Then we did a mini photo shoot (more on this tomorrow) and played outside some more. Key loves playing outside. Off to nap she went. Daddy would be home soon to join us for the evening. For dinner we had homemade chicken nuggets and French fries with lots of dipping options. Keylee loves to dip things. And what kid doesn’t love chicken nuggets and French fries. Dinner was a hit.
 
Then the finale, a movie and ice cream! Some play time and snuggles on a pallet of blankets on the floor while we watched our Veggie Tale adventure.
 
We had a great day and it was special but didn’t cost much of anything. Kids love your time more than any gift you could buy. So take some time for them.

Daspri

Here are the images for the DiY growth chart. It is really cute and portable so if we ever had to move it we are good to go. You can find the pdf here.

Wednesday, November 14, 2012

DiY Jewelry Organization

I have been feeling pretty productive these days and actually tackling some things that I have wanted to get done for some time now.
Now, this is not always the case by any means, but man, does it feel good when it is!
One of the projects that I have wanted to get done is finding a way to hang my necklaces and get them off of the top of my dresser. I wish I had gotten a photo of my dresser before this project so you could see how ridiculous it looked! I literally could not see the top of my dresser because it was covered in an array of various necklaces and bracelets scattered about! It drove me nuts!
But I don't spend a lot of time in my room, so I would see it in the evening before bed and it would drive me crazy and then I would see it in the morning getting ready and it would drive me crazy, but then I leave my room and close the door, for most of the day.
This is what my dresser looks like now!
Woo Hoo! Organization makes me so very happy!
So, here's what I did.

First off, I apologize for these photos. My camera was acting up so I had to use my phone.
I have had this frame stored for a while now because the glass in it broke. I knew I would use it for something so I just hung onto it.
I was cleaning some things out one day and saw it and then it hit me!
I used:

-thick/heavy craft wire
-eye hooks
-wire cutters
-hammer
-ruler
-picture hanger
I simply used my hammer to tap on the eye hook to get it started, then I used my hand to screw it all the way in. I gets kind of hard towards the end, so you may want to have some pliers on hand to help you turn it.
I used a basic ruler to help me get the eye hooks on each side lined up. I used 6 eye hooks for this frame, making three lines of wire to hang jewelry on.
Next, I grabbed my picture hanger and hammer and went to work.
And lastly, I hung all of my necklaces up! I really love the result! It is simple and practical, which I LOVE!
I hung it behind my door because as much as I like the end result, I still didn't want it to be a focal point in my room.
This project literally took me about 10 minutes to do! It took me about three times that to go through, sort and hang my jewelry!


Here are some other fun ideas I have found on Pinterest for jewelry organization.
Lots of inspiration
Lovely Vintage
Industrial

So, don't throw your old frames away! Share your projects with us when you're done too!
Have a lovely day!
-Jenny


Tuesday, November 13, 2012

Girly 2nd Birthday!


We celebrated Keylee’s birthday on Saturday.  This momma has been working for a couple months (during naps, after Key bedtime and other spare time here and there) on goodies for the party. Everything turned out which was very exciting!!! As planning the party came together a little at a time my ideas for what I wanted to do and how I wanted it to look evolved a bit.  When I put the invitation together I had a bit of an idea what I wanted to do but inspiration didn’t actually hit till about a week later and then it all started coming together. I knew I wanted to have a girly/dressy party but not a dress-up party. And since we have so many boy cousins we had to throw in a little man version for the boys. I loved the idea of using tulle because it is so easy to work with and looks awesome. So off I went and here is what we landed with:

Our backdrop ended up quite well with the pics I had blown up (on the cheap) and the big #2 I made. I made a few tulle poms to hang with the other tulle and topped it off with a couple ribbon bows. The little black iron girls my mom had and they fit in just right. The party was at 1 so we didn’t have a lot of food or snacks but veggies are always good especially when there are so many sweets around. So we did a veggie tray along with our cake, cupcakes, ice cream, and juice boxes. The ice cream was scooped up ahead of time into cupcake liners so it stayed in the freezer until the cake was cut.
I also set up a little drink station with the covered juice boxes for the kiddos and sweet tea and lemon water for the adults.
 
I went searching online for a dress pattern to use as a template for some of the projects and came across a very simple little black dress that really ended up being used for everything. I also had some little tuxedo favor boxes I had purchased a very long time ago and ended up being my template for all the little tux decorations and then used as favor boxes.
 

My family!

This probably looks familiar. Last year we have a similar pic!


I could just squeeze the stuffing out of her.
 
 
Of course she was totally loaded down with goodies.
 Here are some of the DiY projects I took on for this party:
~Covered juice boxes - dresses for the ladies and tuxedos for the gentlemen   - Purchased regular juice boxes. Covered them with black paper using hot glue (I used card stock because I feel like it is easier to work with and looks nicer but you could easily use construction paper).   -Added a dress with a sweet little tulle skirt for the ladies and a tuxedo with box tie for the fellas.  -TIP: Make sure you pull off the straws before you wrap the boxes!
 
~ Big Cardboard 2
  - I printed a 2 that I liked off the computer and then blew it up using and old school projector, but you could easily measure and cut one out.
  - Cut out two of the two shape and then decided the width I wanted for the depth of the 2 and cut cardboard strips in that size that I then just wrapped and taped on one side. After one side was complete I added the other side.
- Covered with wrapping paper, sides first with an overlap. Then the front and back.


~ Happy Day Banner
  - I decided to go with square this year. So I cut 6 1/2 inch squares and 4 1/2 inch circles to go inside them. And then the letters were about 3 1/2 inch letters, printed off the computer, traced and cut with my X-Acto knock-off.
  - I also used that same dress pattern with tulle skirts and added the dresses in between the letters.


~ Party Favors
  - I found an awesome pattern for high heel favor boxes online while I was searching around and these little treat boxes ended up so fun. I threw in a couple fun hair elastics, a plastic ring, and candy bracelet-ring-and lipstick.
  - Of course I had the tuxedo boxes on hand already so those were easy. The boys got superhero candy, a badge, and a glow bracelet.


~And finally cake and cupcakes with homemade fondant!
  - I used a box cake mixes for the both the cake (strawberry) and cupcakes (chocolate).
  - For the cupcakes I added a little buttercream icing and then a layer of fondant. I cut out the cirlces with a glass and the little men with a small cookie cutter. Gel icing made up our buttons and bowties!
 
 
  - The cake which looked like two layers was actually 3. The bottom layer was made of two 8 inch rounds and the top of 1 deeper 6 inch. 
  - I covered it in the same buttercream, but for the cake it went all over.
  - I rolled out the fondant and then used a large glass bowl to cut what I thought would be the right size. It wasn't exactly so I pulled it off and spread it some more. Even with the buttercream on it I could still spread it pretty easily. I just put the icing side down on the mat.
  - I rolled out some black to make the bands around the bottom. I made the big bow by cutting a long strip and folding it over to the center. I cut two small strips for the ribbon ends and wrapped another small piece around the middle. I added a few rolled pearls in blue  all the way around and then used a set of cookie cutters to make the purse and the shoe and added a few embellishments.
  - The dress I cut from that same dress pattern I used around the party for constancy.


I have to say I was pretty proud of this cake. My first attempt at fondant (homemade or otherwise) and it tasted pretty good too. I didn't see a lot of plates with fondant peeled off and thrown in the trash. It was actually good enough to eat!
 
A couple tips for working with homemade fondant:
TIP1: Shortening is your friend. Grease everything that will come in contact with your fondant. Your bowls, spoons, cookie cutters, mats, and even your hands. Trust me this will help A TON!
TIP2: Don't always trust the measurements. I found the basic recipe I used to work pretty well but I did have to add more confectioners sugar.
TIP3: Add the food coloring after you melt the marshmallows and before you add the conf sugar. This makes mixing in the color soooo much easier. Add a little extra to the color cause it will lighten up with the addition of the conf sugar.
TIP 4: Use a plastic, well greased, mat for all your rolling and cutting.
TIP5: Invest in a fondant roller. I tried to use a wooden roller with a lot of grease on it...no go. It really makes all the difference in how smooth your fondant will look once rolled out.
TIP6: Don't eat to much while you make it b/c it really is pretty tasty!
 
I love birthdays. I love getting to share milestones with family and friends and I love celebrating people. I hope these ideas inspired you.
Daspri


Other links: 
 
-

Monday, November 12, 2012

Super Hero Birthday Party

We celebrated one of my little boys 6th birthday this past week.  I truly cannot believe that my A. Vox is already 6 years old....so many mixed emotions! He is such an amazing little boy and has brought so much joy to our lives. His tender heart, silliness, compassion and curiosity for nature and bugs just steals my heart. I love this kid!
He has been looking forward to his birthday for months now. Seriously, he has been counting down for months, which makes planning his party even more fun for me!
We partied "SUPER HERO" style, per his request.
We had his party on his actual birthday this year, with just a few of his close friends. They came for lunch, banana splits and lots of playing!
We had "Super Packed Protein Bites" (turkey sandwiches), "Super Strength Snacks" (baby carrots & String cheese), chips, and "Power Charge" drinks.
Mr. A. Vox  requested a build your own banana split bar instead of a birthday cake this year. Super fun!
This was definitely a hit!

The super hero symbols hanging from the streamers were drawn out onto poster board, colored, and cut out, by me.
The images on the black poster board I found online and my sweet grandmother printed them out for me. i then cut them out and glued them all to this poster board.


 I found the "zap", "pow", "bam", and "happy birthday" signs on pinterest, free printables! I had them printed, cut them out and then attached some of them to popsicle sticks to make little signs, taped some to streamers, and the rest to juice boxes.
More super hero images, because you can't have enough of those!

These were on the table. Check them out a bit closer....
Aren't these SO fun?! Again, thank you Pinterest. These were also a free printable. LOVE!
This fun banner hung on the other side of the room, over the sliding doors that lead outside. My friend Tabitha made this herself for her son's party and was sweet enough to offer it to me for our party.
I made these masks out of sheets of Stick-On Felt. There are three different styles of masks and even two hot pink masks for the girls.
They were super easy. I simply traced the mask onto the felt (two different pieces), cut them out, peeled the backing off of the felt, stuck them together, punched a hole (with my rotary tool) in each corner of the mask, and them tied some elastic on.
Now, I was pretty excited about the party favors this year! I have been wanting to buy some glass/porcelain paint pens for a while now. I found some on Amazon and decided to try it out on these clear glass mugs from Dollar Tree. If it worked, then we would have some super cool party favors and if it didn't, I wouldn't be out much money because I only paid $1 for the mug and I could always send the pens back.
Thankfully, they worked! The only disappointing part is that the pens are supposed to be dishwasher safe once the item is baked in the oven and the dishwasher destroyed the image of the mug I washed.
However, they are perfectly fine to hand wash. I have hand washed them MANY times already because my kiddos only want to drink out of these mugs now!
I think they turned out really fun and the kids really seemed to love them.
I filled them with "cocoa kryptonite", candy, and a super hero spinner.
*For the super hero symbols, I simply did a search on google so I would have something to look at while drawing them.

All in all, the party was a success and my big boy had a wonderful birthday!
 We had a super fun time!
signing off today,
Bat girl and Wonder Woman

Pinterest Links of Inspiration:

Super Hero Symbols- these could be printed and cut out to use for templates
Free Printables
Super Hero Suckers


Friday, November 9, 2012

Inspiration in the Mundane

There is still so much beauty in this world. However, I think it is all too easy sometimes to allow the ugliness to overpower it.
Our minds get cluttered, our hearts grow weary and sometimes bitter, and our focus becomes so blurred that we can no longer see the beauty that is right in front of us.
I certainly have had my seasons of blurred vision and those seasons are hard, but by the grace of God, I come out of them with much clearer vision. I see my Savior in all His glory and then I begin to see all of the beauty in His creation that surrounds me daily; the beauty that I often miss in the hustle and bustle of day to day life sometimes.

Oh, how I am grateful for the seasons in which He allows me to see and take it all in.
 This yellow bowl is almost always sitting on my counter full of apples. I walk by them, prepare meals on the same counter, even grab one and slice it and yet, I don't always recognize just how beautiful they are.
I mean, look at them. They are this amazing shade of red. And I absolutely love them paired with that yellow.
These lovelies came from my garden, just this week. I can't grow a good, strong garden during spring and summer months, but man, can I grow some goods during the cold months...without even so much as looking at the garden! Because it is not the right season, they will not ripen on the vine so we get to enjoy this awesome shade of green!
I love it! Can't you just see a dresser painted this color? Or even a pair of ballet slip on shoes! I would totally wear those!
Inspired yet?
Just like my bowl of apples, this bowl is usually full of bananas, lemons, or other citrus fruit. I love this robin egg blue so much and the yellow of those bananas is fabulous! We always have bananas and yet I don'y always notice how wonderful their  coloring is and how great it looks with that blue. Oh yeah, I want some yellow in my living room curtains to go with this blue that is already splashed in there!
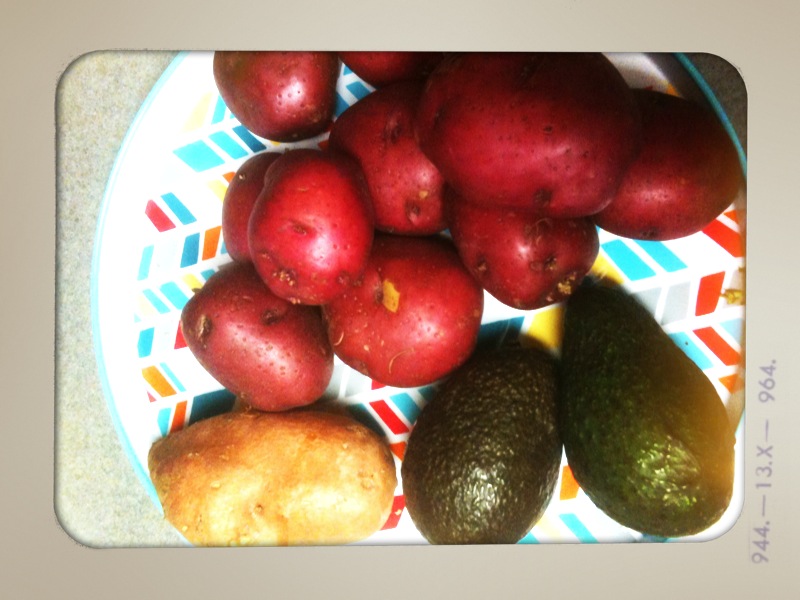
You might be thinking, "potatoes, really?" Yes, really! Look at the texture of all of these veggies. I love the knots in the potatoes and that shade of plum, red and even pink in them. I have always loved the color of avocados and the rough, bumpy texture of their skin is truly beautiful. And we can't forget the sweet potato and it's lovely orange. Even better, when you slice these veggies open, their colors come to life even more!
These make me think of a good, warm woven knit blanket.
And much like my vegetable garden, my herd garden has also decided that it prefers to grow on it's own, with no help from me. Look at this oregano! There is no description needed, it is just so pretty!

I love how God not just made delicious, healthy food for us to eat, but he made them beautiful and pleasing to the eye as well.
I seriously want to paint and make something when I stop and truly look at my surroundings. And more than that, I just want to praise and stand in awe of their Creator....amazing.

Slow down. Open your eyes. Look and take it all in. Enjoy the beauty and be inspired.
-Jenny