Tuesday, December 11, 2012

Light up the Night ~ DiY Lit Porch Christmas Trees


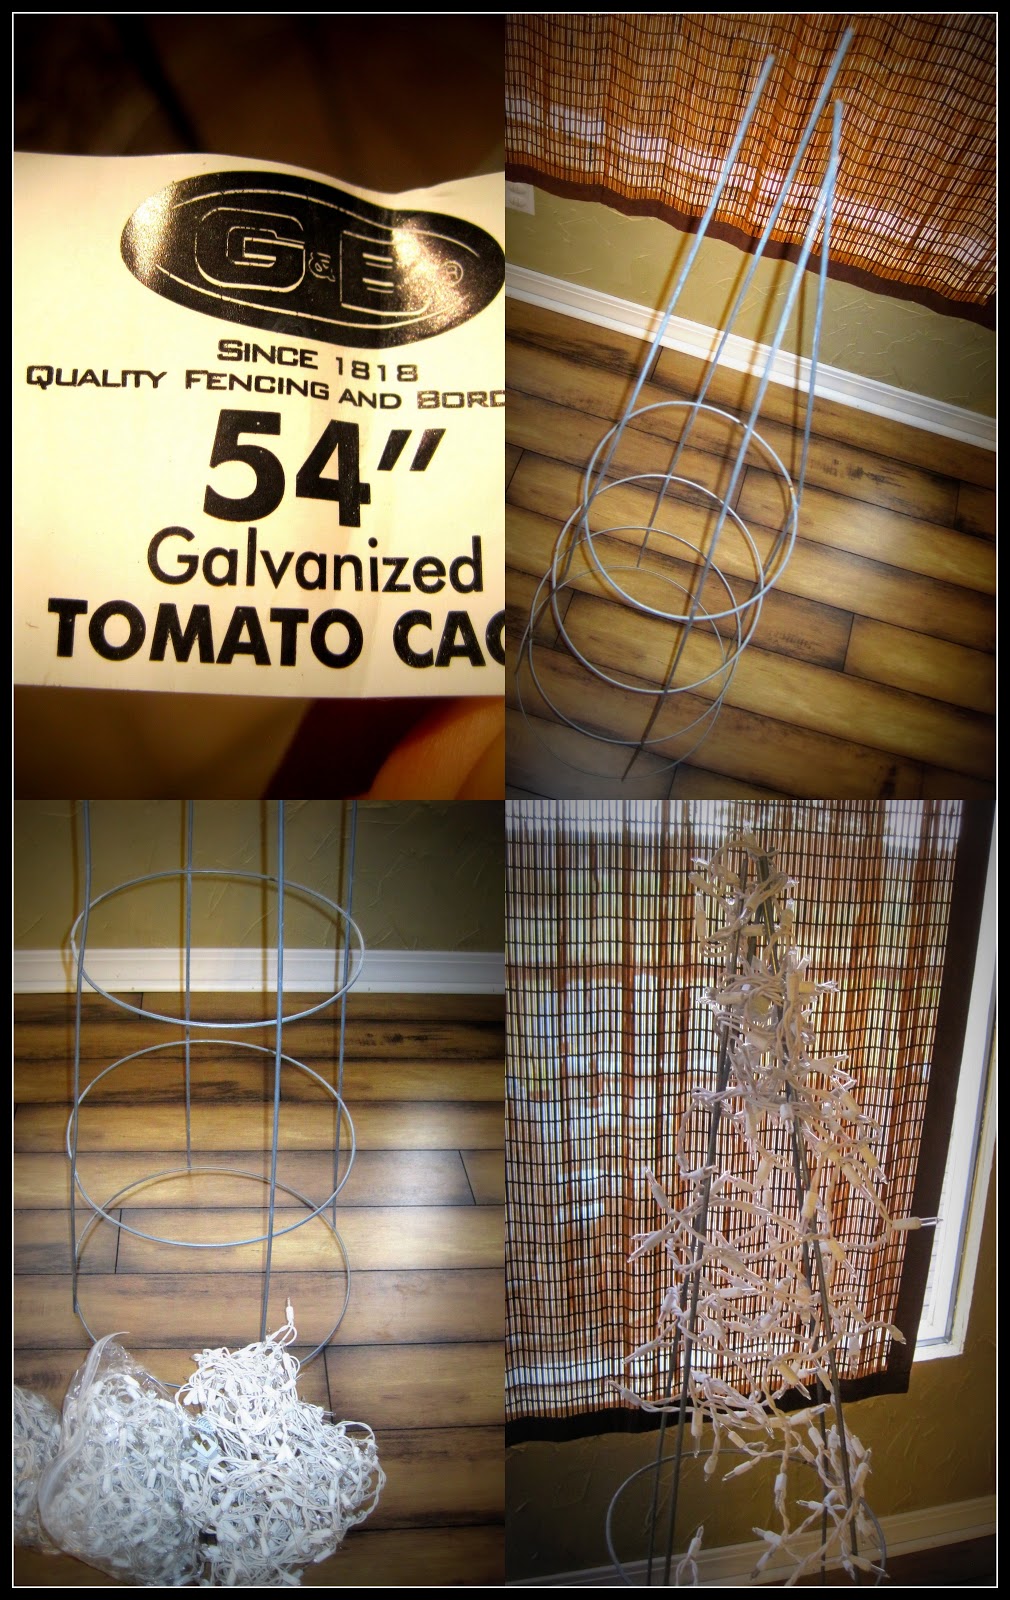
I found another brilliant tip on the Internet ~ tomato cages wrapped in lights to make fun outside lit Christmas tree. This project is sooooo very simple but has such a great impact. All you need is a couple tomato cages and a bunch of old lights. I had some strings of icicle lights that used to go on the outside of the house. I used three per cage. The picture I saw used the regular green strung Christmas lights but I actually like the white better because they are much brighter. 
That wreath probably looks familiar. Check out the tutorial here.


Take the cage and start wrapping from top to bottom. Because the icicle lights are so full and have so many strands hanging down I did not have to use anything to attach them to the cages. Just keep wrapping till you get the desired fullness or run out of lights. I did in fact run out of lights on the second tree and had to unwrap a little bit and pull the lights down to get them all the way to the bottom.


After wrapping away I was finished and totted them out to the porch. I simply love them. They look great at night (my photography wasn’t great on the night pics) and they were pretty inexpensive. Each cage was about $4 and I had the lights so this was an $8 project. The home improvement store I visited also had colored tomato cages but they went up in price. Also I used really tall ones but you could use smaller ones depending on your needs. We all know the lit trees you can buy at the stores are at least three times that amount. I say this was a win!

How do you light up the night during Christmas?
Daspri
 

Monday, December 10, 2012

DiY Christmas Star Sign

Happy Monday to you!
Are you getting your homes decked out and festive for Christmas? Leave a link in the comments to your blog/photos of your holiday decor. We'd love to see!

We have been getting ready around our house. I posted here a couple of weeks ago about our decorations this year. However, since then, I have been doing what I do and that is adding more little touches here and there.
I kept looking at our front porch, knowing that something was missing, that it didn't look quite right yet, and that I wasn't really happy with the outcome. I have been trying to think of something to add to make it like I see it in my head and then......I  was inspired on Pinterest, of course!
So, I grabbed a piece of wood that I already had and was already painted, went through my ribbon box, grabbed my ruler, hammer and nails and went to town!

I put my own spin on it.
I knew that I also wanted mine to be more of a sign with a message, so I made the star smaller, leaving room to write around it.
I used some silver ribbon that I already on hand and then grabbed a sharpened piece of white chalk to finish it off.
What do you think? You wanna make one?!
It is truly super simple. Here is what you need:
-piece of wood
-paint or stain to finish your wood
-ruler & pencil (to mark off your star with good straight lines and points for the nails)
-nails & hammer
-picture hanger to attach to the back
-ribbon of your choice

*Because mine was already painted black and I love chalkboard everything, I used white chalk. You could easily use a paint pen or acrylic paints to achieve the same look.

Ready. Set. Go.
-paint wood
-use ruler and pencil to get your star outline
-attach picture hanger to back
-hammer a nail at each point of the star
-take your ribbon and start wrapping around the nails in star formation
-write/paint your message
-hang and take a step back and enjoy!

I also hung a few more snowflakes on the porch as well. The first ornaments and snowflakes I hung just looked lonely.
Now, when I walk outside my door or come home and walk up to my door, I like what I see. :)

Share your outdoor decorating ideas with us. We love to hear from you!
-Jenny


Friday, December 7, 2012

Holiday Traditions ~ Oh Christmas Tree

Like many families when we arrive home after celebrating the Thanksgiving holiday we pull out our Christmas decorations. I get pretty excited about getting them up because I love Christmas décor. It makes everything feel cozy and festive. Of course for us the first thing to go up is the tree. We always decorate it together and listen to Christmas music. Last year Keylee was still pretty small but she “helped” put her ornaments on the tree. This year she was a big helper and carried ornaments from the table to her daddy to place on the tree and put a couple on herself (at least attempted to, she couldn’t quite figure out how to get the hooks over the branches). 
 
 
She also got to decorate the little tree we put in her room. She did a great job with that one. It was a bit heavy on one side but we helped her even it out a bit.


It is so fun to see how she is growing and learning and getting more creative and coordinated. When do you put up your tree?


Merry Christmas

Daspri

Thursday, December 6, 2012

DiY Kids Felt Christmas Tree


I saw a picture of a cute felt Christmas tree online and decided I could certainly do that. So I went and dug out my stockpile of felt and got to work. I wanted it to fit on Keylee’s bedroom door so I made it a little bit skinny. You can basically make any shape of tree you want.


You’ll need about a yard of green felt and some felt in other colors to make the presents and ornaments. My green felt already had a bit of a crooked curve on one side from another project so I used that as a guideline for the base.
 

I just eyeballed the size I wanted the tree and cut it out. I used a yard stick to cut straight lines. I found some ornament clipart online used it for my template to cut out my different ornaments.
 
 
I assumed the felt would stick to itself and it kind of did but not great. So, I added a bit of hot glue to the back of each to help them stick.
 
 
They stuck a little better but still not great for little hands to get up there so they would stay. Finally, I added a small strip of Velcro to each and that did the trick. They stay on so much better. Key loves to take them on and off and decorate her little tree. Make one for your littles and let the fun begin.


Daspri


Here is the inspiration version.
 

Tuesday, December 4, 2012

Vegan, Grain Free Pumpkin Pie and Dark Chocolate Pumpkin Cookies

It seems like it has been a while since I shared a recipe on here. Oh my, I have some good ones for you today!

I tried out some new recipes over Thanksgiving and they were so good that I will definitely be making some of them again for Christmas.
I really don't crave sugar or other things like that anymore, but one thing I really didn't want to miss out on was pumpkin pie. I love a slice of good ole' traditional pumpkin pie; not pumpkin cheesecake or pecan pumpkin pie; none of the frills, just some pumpkin pie.
So, I was SUPER excited when I saw this recipe for pumpkin pie posted on my favorite healthy eating site, The Detoxinista.
 Here is what you need for the Pumpkin Pie (shown above: these are ALL of the ingredients needed for both recipes I will share today)

Vegan, Grain-Free Pumpkin Pie
1 cup raw almonds, soaked at least 4 hours (or 1/2 cup creamy almond butter)
1 cup pure maple syrup
1 16 oz. can of pumpkin puree (or fresh puree)
2 teaspoons pumpkin pie spice

She recommends using the almond butter in place of the almonds if you don't have a high powered blender like a Vitamix, which I don't.
Mix it all together in a bowl.
Then transfer it to your blender and blend until good and creamy.

 Pour into a greased pie pan and bake at 400 degrees for 15 minutes, then reduce temp to 350 and bake for an additional 30 minutes.
It is so incredibly moist and delicious, you won't believe it!

And because I am pumpkin junkie, I also had to try these pumpkin cookies from the same site. They also did the trick for my pumpkin fix!

Dark Chocolate Pumpkin Cookies-Vegan & Grain Free

1 cup creamy almond butter
1/2 cup pumpkin puree
1/4 cup pure maple syrup (or sweetener of choice)
2 teaspoons pumpkin pie spice
1 teaspoon vanilla extract
1/4 teaspoon sea salt
1/2 cup dark chocolate chips

Preheat oven to 350 and line your cookie sheet with parchment paper.
Mix all ingredients together until smooth and fold in your chocolate chips.
Use a cookie scoop to scoop the dough onto the cookie sheet and then gently press each cookie with a fork. (wetting the fork will help keep it from sticking to the dough)
Bake at 350 for 12-15 minutes or golden brown.
Then enjoy a few with a cup of coffee or almond milk! :)

The holidays don't have to mean filling ourselves with unhealthy meals and treats and undoing all of the hard work we have done the rest of the year. You can still "indulge" and be good to your body too!

Happy Baking!
-Jenny


Dames of DiY ~ Wreaths, Rosettes, and We Have A Winner

For our Dames class this time around we decided to make fun material wrapped wreaths and decorate them with rosettes. This class was a lot of fun (as they all are) and the ladies really seemed to enjoy the projects.


We of course had to start off with some yummy treats and drinks!  And then our ladies got to pick a station with their pals and get their craft on.

To make a wreath all you need is a round foam wreath shape (we used 14 inch wreaths) and the material/ribbon/yarn of your choice to wrap it in. I using material you will need a piece or multiple pieces about 2 inches wide and 225 inches long. The wider the pieces the less length you need. 

~Start on the back side of the wreath. Pin one end of material and start wrapping making sure the edges overlap to cover the entire foam base. Wrap till the material meets at the other end and pin in place. Trim off excess. If using multiple pieces of material you will need to pin each start and end in place.

~TIP: DO NOT use hot glue or other craft glues on your foam wreaths. The heat in hot glue and the chemicals in glues like E6000 melt the foam and leave you with a mess.

Once your wreath is complete you can add your embellishments. Rosettes, ribbons, berries, buttons, letters anything and everything or just one thing. These wreaths are very versatile and can be changed as many times as you like with everything just pinned in place.

For our class we decided to go with rosettes. For the rosettes you’ll need a card stock or material backing, material or ribbon to wrap, and a hot glue gun.

*Start with your card stock circle for the backing. (we used 1 ½ inch circles)

*Grab your material and your glue gun and glue material to the center of the circle.

*From this point, you will be twisting and wrapping your material around in a circle with a dab of glue here and there to keep it in place. You may run out of space on your backing but you can keep wrapping and gluing to the material itself if you would like it to be bigger.

*When you run out of material or you have the desired size of rosette that you want, simply glue your end down.

*To attach to the already completed wreath push a pin through the center of the rosette and hide under your overlapping material and push pin into wreath at desired location.

*TIP: More rosette fun – you can adhere a pin on the back, a barrette, attach them to frames, pillows, scarves, hats, or even make some jewelry with them!


Once we completed our projects we had to take a few fun pics. Each wreath was different just like each Dame and they all looked great. And Jenny and I even got in on the fun with a few accessories!!!


And finally, each lady got to leave with a fun treat bag. Just like the one that Tammy Eros won in our giveaway. Tammy we'll be in touch soon!


If you are local you should join us. We always have a blast!

Daspri


Here is a link to a fun rosette bracelet tutorial for some more inspiration.

Monday, December 3, 2012

Let It Snow! DiY Snow Globes

So, here in the south, we don't get much of that thing you northerners call "snow."  One day, I will take my children some place where the snow falls in such abundance that they can truly know what it means to have a "snow day!"
Thankfully, they are all still little and delight in the wonders of a snow globe. I remember shaking our snow globes as a little girl and sitting for long periods of time, just watching it snow. There is something so beautiful and peaceful about a snow globe.
We took the kids to the local dollar store last year and let them each pick out their own special snow globe. They could not wait to get them out this year.
So, naturally when I saw the idea of making your own on Pinterest, I added it to our advent activity cards!


You will need:
Glass jars (of any kind-if there is writing on the lids, simply spray paint the lid beforehand)
Little trees and figurines
Glitter
Fake Snow
Waterproof glue (such as E6000)

*glycerine or baby oil (this helps to weight the snow down)
*Some sites tell you to use a glue gun-Do NOT do that or your pieces will come off and float about
I often keep jars from sauces and such. I use them to hold various things and gift things too. This time, they became snow globes!
I gathered the rest of my supplies from Hobby Lobby. It was very inexpensive especially since everything Christmas is already marked down.
I allowed the kids to pick what they wanted in their snow globe and where they wanted everything placed, then I helped with the glue part.

First, glue your pieces to the inside of your lid. Make sure you stay inside of the rim. Allow glue to dry for an hour or two.
Second, sprinkle your glitter and snow in the jar. It only takes a very small amount of the snow.
Third, fill your jar to the very top with water.
And lastly, screw on your lid and enjoy the snow!

*Now, I did not have any glycerine or baby oil and failed to see that on the list when I went to buy everything at the store. So, our glitter and snow floats to the top of the globe rather than resting on the bottom. Not ideal, but the kids could care less. The globes are still working their magic! ;)

I also did a little winter scene (waterless snow globe) too. I just think it is so pretty.
For this one, I wanted a substancial amount of snow on the bottom but also wanted to trees to stand above the snow and not be buried.
So, I grabbed  lid from another jar (slightly smaller than the lid for the jar I was using ). The lid actually rested perfectly inside the opening of the jar.
I glued my trees to the top of the smaller lid. While the trees were drying, I placed the fake snow in the jar. Next, I inserted my trees (remember these trees are glued to the top of the lid) into the jar and then screwed on the lid that went with the jar. Shake your snow to the bottom and you are done!

*The lid for this jar was very flat. When choosing the lid to glue your pieces to for this globe, you want to choose a lid that has some height, like a canning lid.
Isn't it pretty!
Don't be afraid to use any size or shape of jar for these globes. See my little pimento jar with two little trees in it? I just love it. (I do need to paint that lid though-ha!)

I also wanted to share some books that we ordered to read through Advent/Christmas season this year.

The Christmas Story( from the Family Reading Bible)
The Christ of Christmas readings for Advent (31 days of devotion by Calvin Miller)

Hope you are enjoying this beautiful season so far!
-Jenny