One of our family traditions, starting from when our oldest (who is now 7 going on 8yrs old) was a baby, is to go spend an evening at Bethlehem Revisited. A local church puts this on and it is A-MAZING!
They build a whole city on their land outside, with walls, merchants, bonfires, deer chili cooking in big pots over the fire, Roman soldiers......the whole nine yards! But the best part is the live story of the birth of Jesus that they tell you as they guide through all of the events played out before your eyes. Then, the very end, there is a live manger scene.
It really is one of my favorite things to do this time of year and my children feel the same way too.
Galatians 4:4-5 But when the set time had
fully come, God sent his Son, born of a woman, born under the law, to
redeem those under the law, that we might receive adoption to sonship.
Isaiah 7:14 Therefore the Lord himself will
give you a sign: The virgin will conceive and give birth to a son, and
will call him Immanuel.
John 10:14-15 “I am the good shepherd; I know
my sheep and my sheep know me— just as the Father knows me and I know
the Father—and I lay down my life for the sheep.
Wishing you all a wonderful Christmas time, full of joy, peace, hope; that only our Savior can give.
-Jenny
Monday, December 17, 2012
Friday, December 14, 2012
DiY Kids Felt Christmas Stocking
I’m always on the prowl for fun Christmas stockings. The
best ones are soooo very expensive so I decided to make ours this year. So far
I’ve finished Keylee’s out of felt and I’m pretty happy with how it turned out.
Yes, another project made of felt. I have a big box full of the stuff and
because it is so inexpensive and easy to work with I make A LOT of stuff out of
it.
~Add whatever embellishments you like (I chose a present that
I stitched ’12 onto and her initials).
~Use an old stocking as a template and traced around it onto
the felt.
~Cut out one side and then pin it to the felt and cut the
other side.
~Use some thick craft thread and whip stitch around the outside
of the two pieces.
~Add a loop at the top to hang it with using the same whip
stitch (I chose green felt with red stitching opposite the stocking itself).
Her stocking ended up being about 21inches by 8 inches.
Pretty good size stocking for a little! Soon comes the fun part…stuffing it
full of goodies!
Happy Friday,
Daspri
Daspri
Thursday, December 13, 2012
DiY Chevron & Peacock Feather Ornaments
Everyone loves chevron right now and peacock feathers are
everywhere. So, in the spirit of Christmas I decided to bring them into
Christmas decorating.
*Take the ornament and tape off your zigzag design. I didn’t
measure I just eyed the spacing. I cut strips of tape then cut them in half and
place them all the way around.
*Paint in between the tape.
*Once the paint has dried you may need to do a couple touch-ups here and there. The great thing about plastic or glass is that you can scratch off the paint if it runs too far.
*Add a bow and some ribbon to hang it with.
*Pull the top off the ornament.
*Grab your peacock feather and push it down into the
ornament (I used the feathers off this other ornament a purchased for a couple
dollars but you can get peacock feathers anywhere).
*Put the top back and tie a bow and a ribbon for hanging.
For the chevron ornament you’ll need: a clear plastic or
glass ornament, some acrylic paint (color of your choice), painters tape, and
ribbon.
*Paint in between the tape.
*Once the paint has dried you may need to do a couple touch-ups here and there. The great thing about plastic or glass is that you can scratch off the paint if it runs too far.
*Add a bow and some ribbon to hang it with.
For the peacock ornament you’ll need: a clear plastic or glass ornament, a peacock
feather, and some ribbon.
*Put the top back and tie a bow and a ribbon for hanging.
Some fun ornaments to add to your Christmas décor. What DiY
ornaments did you make this year?
DaspriWednesday, December 12, 2012
The Candy Cane Poem- DiY Friend or Neighbor Gift
Today, I want to share a fun little poem with you about candy canes.
We read the Bible daily with our children and have many discussions about truth and God's word. But I am also always looking for fun, kid-friendly ways to relate such things to them; to give them a visual, in an effort to help them better understand (without watering down the truth).
I had seen a similar poem before years ago so I was excited to find one again and introduce it to my kids.
I downloaded the free printable here. Then, I had them printed on card stock and cut them out. I let the kids draw pictures on the back of each one. Next, I let the kids go town with the hole punch, punching one hole at the top of the poem and one at the bottom.
And lastly, we carefully stuck our candy cane through the holes. You do have to be careful with this step so you don't rip the paper.
We got invited to the cutest kid Christmas party this morning so it was the perfect time to distribute some of our candy canes to friends!
Check out the fun things from the party!
Each child got to make a reindeer nutter butter and a snowman nutter butter cookie. They also got to make these cute little hot chocolate sticks too!
And for lunch, of course a reindeer PB&J sandwich!
She even made little treats for the moms too! Aren't these little hot chocolate mugs the cutest?!
The bottom is a fudge oreo, then a marshmallow dipped in chocolate bark, sprinkled with a few mini marshmallows and a small candy cane stuck in the side for your handle.
My friend did such a great job on this party. The kids had a blast and so did I.
Check out the links below to make your own kid-friendly holiday treats!
Reindeer Cookies
Snowman Cookies
Reindeer Sandwiches
Hope you are enjoying some fun Christmas festivities yourselves!
-Jenny
We read the Bible daily with our children and have many discussions about truth and God's word. But I am also always looking for fun, kid-friendly ways to relate such things to them; to give them a visual, in an effort to help them better understand (without watering down the truth).
I had seen a similar poem before years ago so I was excited to find one again and introduce it to my kids.
"Look at the candy cane,
what do you see?
stripes that are red
like the blood shed for me
white for my Savior
Who's sinless and pure!
"J" is for Jesus
my Lord, that's for sure!
turn it around
and a staff you will see
Jesus my Shepherd
is coming for me!"
The activity in their advent calendar the other day was to "make treats for friends and deliver them." And this is what I had lined up for them.I downloaded the free printable here. Then, I had them printed on card stock and cut them out. I let the kids draw pictures on the back of each one. Next, I let the kids go town with the hole punch, punching one hole at the top of the poem and one at the bottom.
And lastly, we carefully stuck our candy cane through the holes. You do have to be careful with this step so you don't rip the paper.
We got invited to the cutest kid Christmas party this morning so it was the perfect time to distribute some of our candy canes to friends!
Check out the fun things from the party!
Each child got to make a reindeer nutter butter and a snowman nutter butter cookie. They also got to make these cute little hot chocolate sticks too!
And for lunch, of course a reindeer PB&J sandwich!
She even made little treats for the moms too! Aren't these little hot chocolate mugs the cutest?!
The bottom is a fudge oreo, then a marshmallow dipped in chocolate bark, sprinkled with a few mini marshmallows and a small candy cane stuck in the side for your handle.
My friend did such a great job on this party. The kids had a blast and so did I.
Check out the links below to make your own kid-friendly holiday treats!
Reindeer Cookies
Snowman Cookies
Reindeer Sandwiches
Hope you are enjoying some fun Christmas festivities yourselves!
-Jenny
Tuesday, December 11, 2012
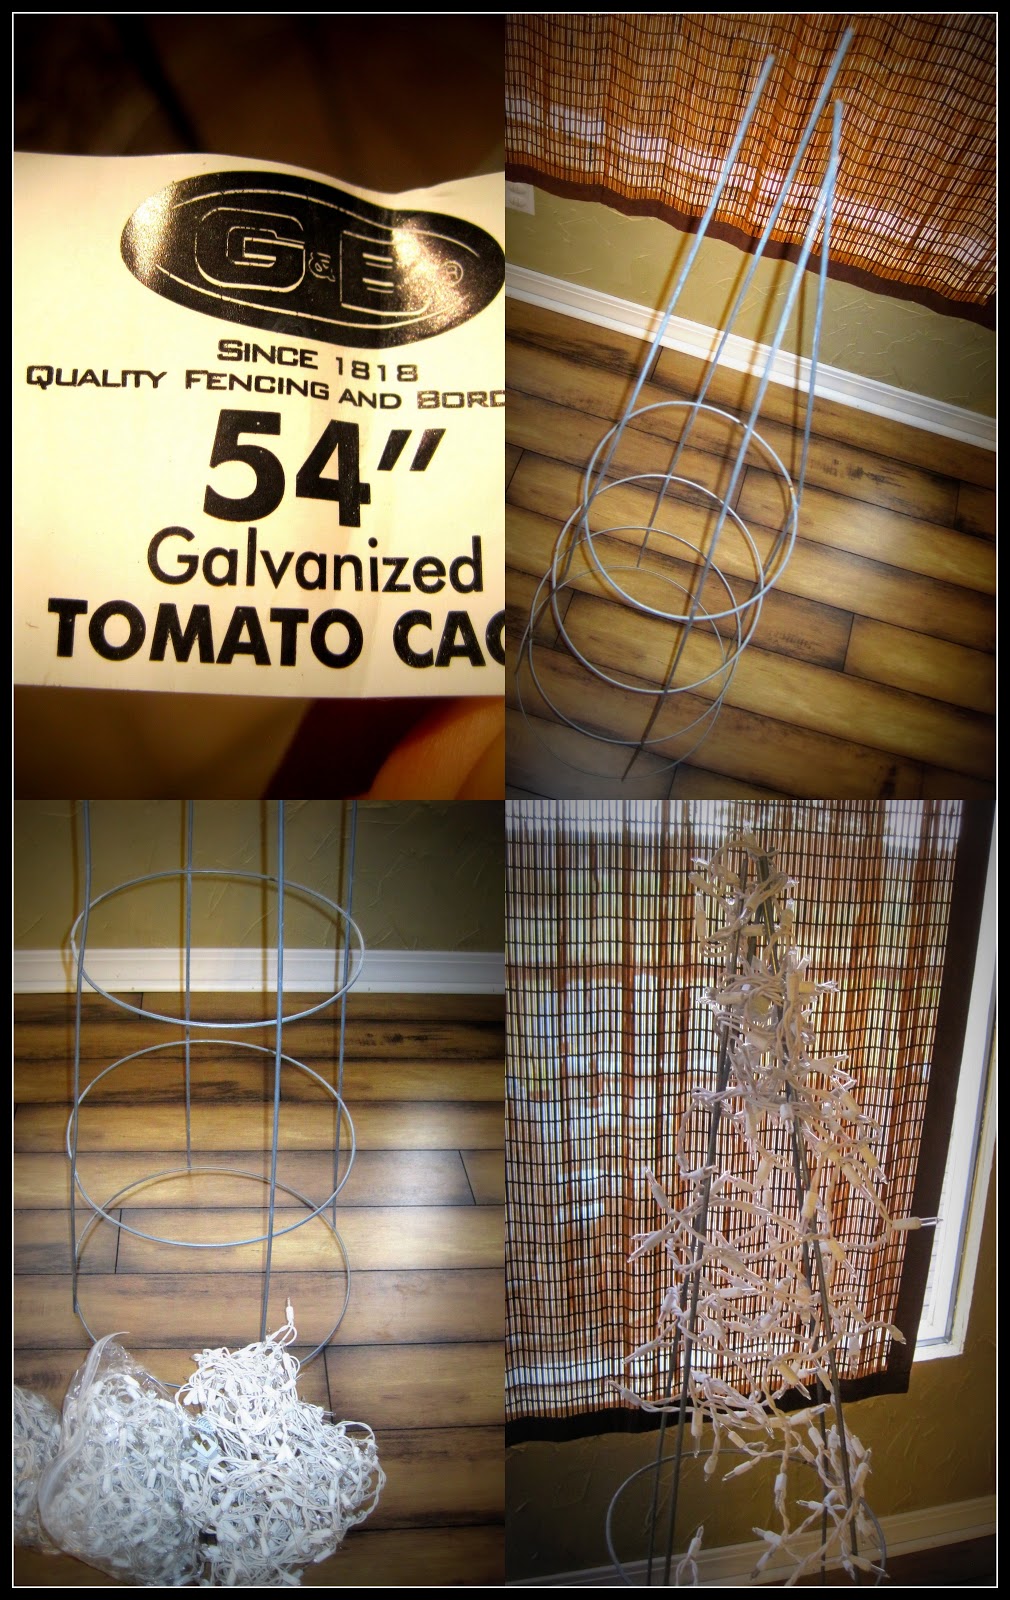
Light up the Night ~ DiY Lit Porch Christmas Trees
| That wreath probably looks familiar. Check out the tutorial here. |
Take the cage and start wrapping from top to bottom. Because
the icicle lights are so full and have so many strands hanging down I did not
have to use anything to attach them to the cages. Just keep wrapping till you
get the desired fullness or run out of lights. I did in fact run out of lights
on the second tree and had to unwrap a little bit and pull the lights down to
get them all the way to the bottom.
After wrapping away I was finished and totted them out
to the porch. I simply love them. They look great at night (my photography wasn’t
great on the night pics) and they were pretty inexpensive. Each cage was about
$4 and I had the lights so this was an $8 project. The home improvement store I visited also had colored tomato cages but they went up in price. Also I used really tall ones but you could use smaller ones depending on your needs. We all know the lit trees
you can buy at the stores are at least three times that amount. I say this was a
win!
How do you light up the night during Christmas?
Daspri
Daspri
Monday, December 10, 2012
DiY Christmas Star Sign
Happy Monday to you!
Are you getting your homes decked out and festive for Christmas? Leave a link in the comments to your blog/photos of your holiday decor. We'd love to see!
We have been getting ready around our house. I posted here a couple of weeks ago about our decorations this year. However, since then, I have been doing what I do and that is adding more little touches here and there.
I kept looking at our front porch, knowing that something was missing, that it didn't look quite right yet, and that I wasn't really happy with the outcome. I have been trying to think of something to add to make it like I see it in my head and then......I was inspired on Pinterest, of course!
So, I grabbed a piece of wood that I already had and was already painted, went through my ribbon box, grabbed my ruler, hammer and nails and went to town!
I put my own spin on it.
I knew that I also wanted mine to be more of a sign with a message, so I made the star smaller, leaving room to write around it.
I used some silver ribbon that I already on hand and then grabbed a sharpened piece of white chalk to finish it off.
What do you think? You wanna make one?!
It is truly super simple. Here is what you need:
-piece of wood
-paint or stain to finish your wood
-ruler & pencil (to mark off your star with good straight lines and points for the nails)
-nails & hammer
-picture hanger to attach to the back
-ribbon of your choice
*Because mine was already painted black and I love chalkboard everything, I used white chalk. You could easily use a paint pen or acrylic paints to achieve the same look.
Ready. Set. Go.
-paint wood
-use ruler and pencil to get your star outline
-attach picture hanger to back
-hammer a nail at each point of the star
-take your ribbon and start wrapping around the nails in star formation
-write/paint your message
-hang and take a step back and enjoy!
I also hung a few more snowflakes on the porch as well. The first ornaments and snowflakes I hung just looked lonely.
Now, when I walk outside my door or come home and walk up to my door, I like what I see. :)
Share your outdoor decorating ideas with us. We love to hear from you!
-Jenny
Are you getting your homes decked out and festive for Christmas? Leave a link in the comments to your blog/photos of your holiday decor. We'd love to see!
We have been getting ready around our house. I posted here a couple of weeks ago about our decorations this year. However, since then, I have been doing what I do and that is adding more little touches here and there.
I kept looking at our front porch, knowing that something was missing, that it didn't look quite right yet, and that I wasn't really happy with the outcome. I have been trying to think of something to add to make it like I see it in my head and then......I was inspired on Pinterest, of course!
So, I grabbed a piece of wood that I already had and was already painted, went through my ribbon box, grabbed my ruler, hammer and nails and went to town!
I put my own spin on it.
I knew that I also wanted mine to be more of a sign with a message, so I made the star smaller, leaving room to write around it.
I used some silver ribbon that I already on hand and then grabbed a sharpened piece of white chalk to finish it off.
What do you think? You wanna make one?!
It is truly super simple. Here is what you need:
-piece of wood
-paint or stain to finish your wood
-ruler & pencil (to mark off your star with good straight lines and points for the nails)
-nails & hammer
-picture hanger to attach to the back
-ribbon of your choice
*Because mine was already painted black and I love chalkboard everything, I used white chalk. You could easily use a paint pen or acrylic paints to achieve the same look.
Ready. Set. Go.
-paint wood
-use ruler and pencil to get your star outline
-attach picture hanger to back
-hammer a nail at each point of the star
-take your ribbon and start wrapping around the nails in star formation
-write/paint your message
-hang and take a step back and enjoy!
I also hung a few more snowflakes on the porch as well. The first ornaments and snowflakes I hung just looked lonely.
Now, when I walk outside my door or come home and walk up to my door, I like what I see. :)
Share your outdoor decorating ideas with us. We love to hear from you!
-Jenny
Friday, December 7, 2012
Holiday Traditions ~ Oh Christmas Tree
Like many families when we arrive home after celebrating the
Thanksgiving holiday we pull out our Christmas decorations. I get pretty
excited about getting them up because I love Christmas décor. It makes
everything feel cozy and festive. Of course for us the first thing to go up is
the tree. We always decorate it together and listen to Christmas music. Last
year Keylee was still pretty small but she “helped” put her ornaments on the
tree. This year she was a big helper and carried ornaments from the table to her daddy to place on the tree and put a couple on herself (at least attempted to, she couldn’t quite figure out how to get the hooks over the branches).
She also got to decorate the little tree we
put in her room. She did a great job with that one. It was a bit heavy on one
side but we helped her even it out a bit.
It is so fun to see how she is
growing and learning and getting more creative and coordinated. When do you put
up your tree?
Merry Christmas
Daspri
Subscribe to:
Posts (Atom)