Thursday, January 31, 2013

DiY Tape Roll Bracelet


I’m all about taking things and reinventing them. So when I finished a roll of wide painters tape a while back and saw the perfectly round and sturdy cardboard base left I threw it in my pile of goodies to keep for a day of creating. I decided to get it out and turn it into something. Of course the most obvious choice was a bracelet.


So here is what I did:
I took the base and painted it white to make sure the writing was covered. Then I chose a fun turquoise as the base color. Once I did a couple coats of the turquoise and let that dry really well (about an hour) I took a piece of scrap lace and dipped it in modge podge. I wrapped the bracelet with the lace and pressed it down so it was stuck in place well. I got a glass and pushed the bracelet down onto the glass to hold the lace in place while it dried. During the drying process I pulled the bracelet off and pressed the lace down and flipped the bracelet to make sure it was pressed all around the middle. Again I let this dry very well (overnight) before moving on. Once it was dry I took the cup and pressed it in and spun the bracelet around it to make it smooth and even on the inside. (yes, it will be hard because that is what happens when glue dries. But if you’ve pressed it down correctly and worked the inside flat against the bracelet it shouldn’t be an issue when wearing it.) Then I took my embellishments and stitched them on, tying knots at each end to ensure they stayed secure.  

You’ll need:
Cardboard tape roll
Acrylic Craft Paint
Modge Podge
Lace/ribbon/yarn/material for wrapping
Drinking Glass large enough around to press out against the roll
Beads or other embellishments
Needle and Thread
Step by step:

1. Paint your tape roll with a base coat to cover all writing. Let dry approx 30 mins.

2. Once the base coat has dried add a coat of your chose of color. Let dry approx 30 mins.


3. Once the color coat has dried wrap or modge podge wrap the next layer. Smooth out so all ends are secure. Press down onto glass. While drying remove from glass and press down ends again and flip before putting back on glass. Let dry completely overnight.


4. Stitch the embellishments on and knot to hold in place.


Also, you could take a sharp knife or small saw and slice it in half to make more than one if it is wide like this one. If you have small wrists and it is too wide just stack it with another fun bracelet that is a bit smaller.

So start holding on to those used up tape rolls. Your new arm jewelry is waiting!
Daspri

Tuesday, January 29, 2013

Gluten Free, Grain Free & Vegan Banana Coconut Muffins

Ah, muffins.....i love you.
If you missed the last tasty and healthy muffin recipe, you can check it out here.

Today, I want to share another favorite in our home, Banana Coconut Muffins. These muffins are so moist and full of banana flavor. They are easy to make and use minimal ingredients, my favorite kind!
I failed to take a photo worthy of these muffins this time because they all disappeared so quickly! I will take a better one next time I make them....maybe.

They are not the prettiest muffins because they do not rise, so you will want to fill those muffin cups full. And if you pile them just right, add that nice sprinkle of coconut, then they can still look presentable. But the important part is that they are super yummy and I can totally eat them because they are grain free, gluten free and sugar free!
I scored this recipe from my favorite raw/whole food site.

Banana Coconut Muffins
4 ripe bananas
1 cup coconut flour
1 heaping T coconut oil
1 T pure vanilla
1 tsp cinnamon
1/2 cup pure maple syrup
stevia (to taste)
dash of salt
1 tsp baking soda
1 T apple cider vinegar
-unsweetened shredded coconut

Bake at 400 for about 25 min.(until tooth pick comes out clean!)

-Mash your bananas
-Add coconut flour, oil, vanilla, cinnamon, maple syrup and salt and stevia.
-add the baking soda and apple cider vinegar last.
-Fill your muffin cups full and sprinkle with coconut

Enjoy!
-Jenny           


Girl Time - JUST DO IT!

As mommas we always do our best to make sure everyone is fed, decently clean and happy, the house is picked up, the laundry and dishes washed, kids played with and educated, and life is moving forward. Let me say that I am blessed to have a food to cook, a house to clean, laundry to wash, and a little one to chase around. There are many that do not have these privileges. But, as blessed as I am I also really enjoy a little time away to recoop. I have always wanted to do girl weekends with friends to shop and laugh and chat and eat and shop and eat and laugh; repeat, blend and repeat! I've had the luxury of a few girls only weekends during my lifetime, but for the most part these weekends were nothing but a hopeful dream because people are busy and finances are tight and life gets in the way.

One of my great buddies (7 months pregnant with her 4th baby) needed one of these weekends away to relax before the newest addition to her family. We were so pleased when all things aligned and we got away, girl style!

Note: Excuse some of the photos, I quickly snapped most of them with my phone.

We spent the first few hours at a really fun local bead store (we share a love for jewelry making; she’s pretty new to the gig but makes awesome stuff). We took our time to look through all the nooks and crannies, dig through the bowls of random pieces, talk with the ladies that work there about different techniques and new products, and make our selections. This for us was a BLAST!


We took a break to grab a drink and sit for a while and then off we went to shop a little (ok, a LOT). We made our way through many (can’t tell you how many) stores. Some stores we just browsed and got ideas for making things, some stores were having great sales and BOGOs which we couldn’t pass up. We stopped off for dinner and the off to our hotel.

Now, a note about me, I’m frugal (fun word for cheap) but my friends hubbs wanted to treat her on her getaway so he got us a great room in one of the much nicer local hotels. The beds were very fluffy and awesome and we laid in them and chatted for hours.

The next day when we got up we were told to order room service (again strikes the hubbs). So we did and it was awesome to eat in bed and relax without having to rush around for something to eat.


I even took a few minutes to Skype with my little peanut and tell her how much I missed her (love me some technology). We took our time getting ready and checked out of the hotel leisurely.

We hit up an outlet mall and then off to a late lunch. The place we went is a local place called McFarlain’s which my hubbs and I love. It is home cooking with a touch of extraordinary. We always get the fried green tomatoes so I shot him a quick pic just to let him know we were doing things right. We ate too much food and dessert and loved every bite. A bit more shopping to round off the trip and then off to the homesteads.

Amongst all the shopping and eating we had such great convos and really got to take our time and laugh a lot. It was such a great time with a friend that I am so blessed to know. The best parts of the weekend were really the down times (the drive up, the evening at the hotel, and the drive home) when we got to just talk. Sometimes it’s hard to have a really great conversation with little ones all around.

While we were gone I received this pic of Keylee playing and I smiled ear to ear.


I am a believer in girl time. I think getting out for a cup of coffee, dinner, a movie, some shopping, walking at the park, etc. with a friend is much needed. A couple days and a night away really is quite different. It forces you to release your lists completely (if even for a short time) and relax a bit more.

Of course once you get home the reunion with the ones you love couldn't be sweeter!  

Blessed!
Daspri


Monday, January 28, 2013

Gluten Free Grain Free Blueberry Muffins

I don't know about you, but I love a good muffin with my coffee. When I began this health journey back in May of 2012, I thought of muffins and scones and how I would miss them. Sounds kind of silly to type that but for me, they were like a treat, even a dessert at times. Now, I didn't lose sleep over it or anything, but I did begin searching for healthy alternatives.
This recipe is one of my favorite finds.


Almond Flour Blueberry Muffins
2 cups almond flour
2 eggs
2 egg whites
1/4 cup raw honey
dash of sea salt
1 tsp vanilla
2 T coconut oil
1/2 tsp baking soda
1 T apple cider vinegar
1 cup blueberries

Mix the first 7 ingredients together. Then add the baking soda and apple cider vinegar to the mixture. Next, fold in your blueberries.

Bake at 350 for 25 minutes.

*I sprinkled some unsweetened shredded coconut on top of these too. YUMMY!

They are moist and full of flavor without the grains, gluten and the sugar. And they are packed with all of the wonderful protein and antioxidant power of almonds and blueberries!

Enjoy!
-Jenny


Re-style- DiY Shoe Fun

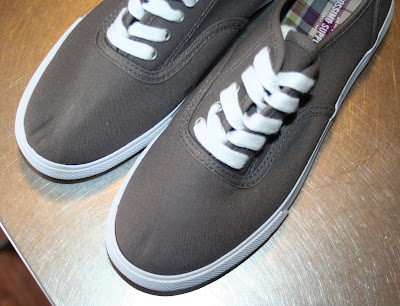
I have been itching to make over some more canvas shoes since my last attempt. I had been on the hunt for some inexpensive canvas shoes when I finally came across this pair on clearance at Target.
You need:
Canvas Shoes
Fabric Markers ( I used Sharpie Fine Tip Fabric Markers)
tissue paper/grocery bags (to stuff your shoes)

First, you'll want to stuff the toes of your shoes with tissue paper or grocery bags (which is what I used). This will give you a solid, smooth surface to write on.
As you can see from the photo above, one shoe is smooth and ready to write on (stuffed) and one is dented (not stuffed).
Now, you can start adding some character to those shoes!
I did not copy or follow anything for my design. I just wrote about things I love, things that inspire me and things that make me smile. No rules!
What do you think?
This was such a fun and easy project. I believe I need to go shopping for more shoes now!
I kind of love them!

Now go buy some shoes and fabric markers, get creative, take pictures and share with us! 
-Jenny


Saturday, January 26, 2013

My weekend -Hipstamatic Style

So, I have been busy busy this weekend working on things around the house, some fun DiY projects, and some jewelry making for my line at Branch Out.

I am telling you, I feel so much better when I make time to create something.  It refreshes and energizes me every time!
Made some yummy muffins, drinking my fair share of hot tea and coffee, experimenting with styling my new hair cut different ways (straight, wavy-too fun!), Bok Choy, playing with yarn and brightly colored fabrics........
can't wait to share more on these projects with you soon!

Make time to make something...it's good for you!
-Jenny

Friday, January 25, 2013

Bangin'

Well, Fridays are fun...at least they should be. To add a little extra fun to my Friday I got a few bangs and layers cut last night. I happen to have a buddy that I used to work with who cuts my hair now and then when I get an impulse desire for a haircut. I called her up tonight and asked if her kitchen scissors were ready to go (no she isn't a hairdresser professionally and yes she literally uses her kitchen scissors) and off we went. My hair is pretty thick so she did quite a bit of thinning and gave me some fringy bangs. 

So here is a quick before and after:


What do you do to add some fun to your Friday?
Daspri

Thursday, January 24, 2013

Get Creative With Your Left-overs- Fish Taco Bowl

We don't often have many left overs on a regular basis around here.  We are a family of 6 with growing children so most of what I cook gets taken out!
However, when we do have left overs, I try to get creative with how I serve them the next day. It's fun to me to try and make a different meal out of them if possible.
It also makes what might have been just enough left overs for 2 people, sometimes able to stretch for the whole family by simply adding a few more things.
 This is the meal and recipe I shared with you yesterday.
 This is my lunch today.
We had one piece of baked Tilapia left and just enough Jasmine rice for one person. I was already making the kiddos some pinto bean and guacamole burritos so I thought I'd spice my dish up a bit too.
I got out my skillet, added the tilapia and rice, broke up the tilapia with my spatula into pieces, added some red bell pepper, some fresh cilantro, and a bit of salsa and enjoyed what I like to now call, Fish Taco Bowl!
It was DELICIOUS!

Get creative in the kitchen. Just like with anything else creative, once you start doing it, your creative juices start flowing and it's not so scary anymore.
It's fun!

-Jenny

Pump It & Unsticky Anything with WD40


I’m a fan of upcycling anything I can. So, when I was in the shower one day looking at Keylee’s baby wash that comes in a pump bottle it got me thinking. Pump bottles are the way to go! When you’re in the shower and you hands are soapy or wet it isn’t always easy to hold on to those flip top lid bottles. So, I’ve begun the journey to switching out all our shower goodies into pump bottles. When we use all of the contents of a pump bottle I clean it out, pull the sticker off and fill it with shower goodies like body wash, shampoo, etc. My pump bottles come from either lotion or Keylee’s baby wash. Why not just keep them and refill them with what came in them? Well, mostly because these products are usually sold in a pump bottle and the price for purchasing them in the pump bottle is not really more than buying them regular. And most shampoos and body washes do not come in pump bottles at all.


So start upcycling those pump bottles. And here’s a tip: if you pull off a sticker and some of the sticky remains there are a couple great things to help remove that sticky. Rubbing alcohol and believe it or not WD40 is amazing for removing sticky! Just spray the WD40 on the sticky area and rub and scratch off the sticky. Then make sure and wash the area with a good oil removing soap. 


Now get out there and pump it!
Daspri

Wednesday, January 23, 2013

A Cup of Tea

So, I have decided that I am going to drink more hot tea. I always enjoy it when I do. I always want to drink it more.
But alas, my love for coffee always gets in the way.
Not this time.
 That's the plan anyway; to drink more hot tea than coffee...for a while. ;)
This is one I am trying for the first time and it is pretty yummy. It has a very light flavor and with no caffeine, it really is pretty soothing.
It is Echinacea Immune Support, which I thought was fitting since everyone around us seems to be getting the flu!
It is loaded with goodies; Echinacea root, Elderberry extract, Cinnamon bark, peppermint leaf, Rose Hip, Ginger root, Mullein leaf, and more!

Do you drink coffee or tea? What's your favorite blend?
-Jenny


Wellness Wednesday-Brussels Sprouts!

It's Wednesday and I thought another installment of Wellness Wednesday was long overdue.
So, let's talk about Brussels Sprouts! They are delicious!  Who knew??!!!
Not me.
I had never had one before and grew up thinking that they were gross and I should stay away.

That all changed a few months ago when a good friend handed me a large bowl of them from her garden.
I am open to trying new things and especially love trying new vegetables, but I have to admit that when she said they were Brussels Sprouts, I might have twitched a little bit.
They are so pretty to me; little tiny, bright green, crisp leaves. But they are not just pretty and delicious. They are really good for you too.

Let's look at some facts.
Brussels sprouts are loaded with vitamin A, folacin, potassium, calcium. They have 3-5 grams of fiber per cup, and at 25 calories per 1/2 cup cooked, they give us a reason to eat them more often. Brussels sprouts are one of those foods that will fill you up, without filling you out.

Brussels sprouts are very high in fiber, and they belong to the disease-fighting cabbage family. Indeed, they look like miniature cabbages. Like broccoli and cabbage -- fellow cruciferous vegetables -- Brussels sprouts may protect against cancer with their indole, a phytochemical.

Brussels sprouts are also particularly rich in vitamin C, another anti-cancer agent. Whether you choose them for their healthiness or because you love Brussels sprouts, one thing is certain: You will be getting a good-for-the-body food that is high in protein and low in fat and calories.


Now, let's talk recipes for these little beauties!
 First, wash them. Then cut them in half/quarters.

 Next, toss them in a bowl with about 2 tbs of oil. I used melted coconut oil because that is what I had on hand, but extra virgin olive oil would work just as well.
Then, I sprinkled some of this on them, as well as some garlic salt. This particular seasoning has salt, pepper, garlic and a few other spices in it without the MSG and all of the other unnecessary bad stuff that lots of seasonings have in them.

Next, you will spread them out onto a cookie sheet and roast them in your preheated oven at 400 degrees for about 10 minutes.

They are seriously loaded with flavor and just enough crunch.

Here's what the rest of our meal looked like.
Caramelized onions and sauteed mushrooms. Simply slice, add a tbs of oil to your skillet, and  sprinkle some sea salt and garlic if you'd like.  Turn up the heat to medium high. They are done in just minutes (when they have a bit of caramel color to them but still a little crunch)
 Baked Tilapia (a small drizzle of oil on each fillet, freshly squeezed lemon juice, garlic salt, sea salt and pepper-baked at 400 for about 15min).
Served with a bed of Jasmine rice (my fav!), roasted brussels sprouts, and caramelized onions and mushrooms.

A delicious, low calorie meal packed with nutrients and protein!
Give them a try!
-Jenny

Related Links:


Tuesday, January 22, 2013

Take Heart


Yesterday was a good day! but for most of the day I felt…flat lined. I’ve had these days before where I’m not necessarily in a bad mood or good mood but just there. Ever have one of those days? I don’t mind them, but sometimes they can start me down the wrong path to a not so great week. So, for those of you having one of those days, the word of encouragement that I got was this:

Be strong and take heart, all you who hope in the LORD. Psalm 31:24


It felt like something I should share and leave it at that.
Daspri

Monday, January 21, 2013

Decorating With Color

I am a HUGE fan of color. Plain and simple, it just makes me happy.

I am working on changing our living room, which I am quite excited about. It was time for a change. Change is good.

One super easy and affordable way to bring some color and change into your space is with throw pillows.  Now, store bought throw pillows can be crazy expensive (at least they are to me) and I can't always find what I am looking for.  So, I opt for making my mine.

 First, go fabric shopping, which I love! There are so many great choices out there. I wanted to bring in a few new colors to our living room, the cobalt blue and red.  I wanted something that also had a few of the other colors in our living room too, so this fabric was perfect. I am also loving this fabric choice for my pop of red.
Next, take your measurements and start cutting. Is it weird that I love the crunch sound that a good pair of sharp scissors makes when cutting fabric?
I do things a bit unconventionally and don't actually measure to cut. I lay my pillow insert on top of the fabric (inside out), fold the fabric over and then make my cut allowing about a 1/2 inch for the seam. That way, the puffiness of the pillow insert is accounted for and I have one side of the pillow that is the fold and does not need sewn.

Then, you simply crank up the ole' sewing machine and make start stitching those straight lines, leaving one side open to insert your pillow.
After I have sewn with a straight stitch, I like to cut off any excess and then go back over it with a zig zag stitch to finish the edges.

Next, insert your pillow. Take your unfinished side and fold the material inward making a nice seam. Pin it and sew.

Voila!
 I am really excited about how they look and I can't wait to show you the rest of our living room!
As you can see, I purposefully took and cropped these photos so you could only see the couch, not above or beside!
It's a surprise.

Don't be afraid of color. It wants to be your friend.
Embrace mixing bold patterns. You will be pleasantly surprised. :)
-Jenny

UPDATE: I forgot to mention my fabulous chevron pillows! Daspri gave them to at Christmas and I super excited about them. You can find them right now at Hobby Lobby.

Friday, January 18, 2013

DiY Decorative Glass Bottles/Coffee Mugs (Sharpie)

Okay friends, we have all seen the numerous posts about using any ole' Sharpie marker to write/draw on a coffee mug or plate. Am I right?
Well, I have tried this....a few times. It works okay for a mug that will be very gently used and definitely not washed in the dishwasher or scrubbed. And that's okay with me for a mug for myself, but necessarily for a gift for someone else. I hate the thought of their gift being accidently thrown into the dishwasher and therefore, ruined.
I even bought some specialty markers online that are meant for this type of thing and claim to be dishwasher safe.
NOT!
They do wear better with the hand washing and scrubbing but they do not handle the dishwasher well at all.  They were also not as easy to work with because they resembled a paint pen; not near as smooth as a Sharpie. 
Then, I came across this little tip on Pinterest. 
I was pretty excited to find this and then my husband actually bought me some oil based Sharpie's with all of my other fun art supplies at Christmas! It was meant to be!
So, here are the little beauties. Mine are metallic colors, but you can buy them in all sorts of colors. These are meant for many different surfaces (wood, glass, metal) and they are fade-resistant and water proof.
These are the bottles that I decorated and used for the natural scented lotion I made. 

It is as easy as it sounds. 

First, you simply take your oil based Sharpie and begin writing or drawing on your bottle or mug.

Second, you need to let your mug/bottle dry for 24 hours. So, set it down and walk away. ;)
DO NOT SKIP THIS STEP. THEY MUST DRY FOR 24 HOURS IN ORDER TO SURVIVE THE DISHWASHER.

And last, you will place your mug or bottle into the oven first. Then, you will turn your oven on and set it to 350 degrees.
*Do not turn the oven on before putting your mug/bottle in it. You want them to warm up with your oven.

Once your oven is preheated at 350 degrees, set your timer for 30 minutes.
When the 30 minutes is up, turn your oven off but leave the mug/bottles in the oven until they are cool.


I grabbed a mug from our collection just for fun. I really like how it turned out. And guess what?! 
It survived the dishwasher!

Go grab some cheap coffee mugs, bottles, etc and let your imagination run wild!
-Jenny